Friday, June 5, 2015

You Know You're In Loki's Army When... (Part 2)


Everyone knows Loki just isn’t Loki without his epic golden helm.  His horns are the most recognizable element to his costume.  Without them, a Loki cosplay lacks that magical quality that makes him the god of mischief.  For the record, this piece took me 4 days to make.  I was pleased with my first attempt, but in retrospect, I feel like I should have spent longer on it to get a smoother appearance.
Credit: Thomas G Ricks / Fox 2 News
Let me begin my instruction by giving credit where credit is due.  I got the idea for the horns from http://www.craftymischiefbybrittany.com/2012/12/loki-helmet-tutorial.html.  She suggested buying a heart shaped foam wreath and cutting it in half.  GENIUS!  


12in Extruded Foam Heart White http://www.joann.com/floracraft-1-1-4inx12in-styrofoam-heart-1pk-white/1301878.html
$4.99

I cut the first one incorrectly so I had to buy a second.  (See below.)


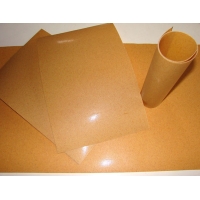
I then used a 1/4" thick sheet of black craft foam for the base of the helm.

Creatology® Foam Sheet http://www.michaels.com/M10390268.html?dwvar_M10390268_color=Black#q=foam+sheet&start=5 $0.99
I made a template for the base out of generic printer paper first, then I traced it onto the foam with a regular No. 2 pencil before cutting it out with a sharp pair of scissors.


Here’s where it got tricky…


I used worbla to cover the foam.  If you have never worked with worbla before, the only thing I have to suggest is BE PATIENT!  Do not rush or you will get frustrated and make more mistakes. 
Worbla Thermoplastic – Small Sheet https://www.cosplaysupplies.com/store.php?p=WORB0.12 $29.00
A thermoplastic is a material that becomes more pliable when heat is applied to it.  The thinner the worbla, the less heat is needed to manipulate it.  I was actually able to use my normal hair dryer for most of the process.  Before I wear this costume again, I plan to use a heat gun on the padding, but more on that later.  The shinier side of worbla is the stickier side, so it self-adheres, which can be both good and bad.
I created a rough template for the horn covering out of parchment paper first.  I then traced the template onto the worbla and cut it out with the same scissors I used for the foam.  (Again, this is very easy to manipulate in a thin state.)  Due to limited material, I wound up cutting the base for the helm out in 2 halves, but I already planned to add an additional piece in the middle (over the crease) for embellishment anyway.


In order to ensure the horns would stay attached to the base, I glued them into closet rod mounts.  (You will need 2 bags because only one mount per bag is perfectly round.)  Before I attached them, I used the mounts as templates on the base to decide where to place the horns.  (I chose the area above the outer halves of my eyebrows.)  I also made sure to trace the inner diameter as well.  (This will become important shortly.) 
Real Organized Fixed Mount Rod http://m.lowes.com/pd/Real-Organized-Fixed-Mount-Rod-Support/50036818?CAWELAID=320011480002257392&cm_mmc=sm_pi-_-richpins-_-WireClosetShelving-_-50036818 $1.68
When I was satisfied with the placement, I used E6000 glue to bond the horns to the mounts.  I let this set up overnight.

E6000 Mini 4Pack http://www.joann.com/e6000-mini-4pack/12536454.html#q=e-6000&start=4 $5.49

The next day, I began molding the worbla to the horns, working from the bases to the tips.  After each horn was covered (they will look really primitive at this point), I used a dremel tool to sand down the bulges.  You can also just buy a heavy grit sand paper, but it’s already a time consuming job with the Dremel, so again, BE PATIENT!


I cut the small circles from the inner diameter of the mounts out of the base worbla with an exacto knife.  I then pushed each of the horns through the holes.  At this point, I heated the base worbla and adhered it to the base foam.  (I did use a little more E-6000 on the bottom of the mounts to further bond them to the foam.)  When I was confident that everything had lined up the way I intended, I stood the horns up against a wall to set up overnight.


The next day I cut out the middle base piece to cover the crease, and I heated the worbla and adhered it to the base.  I also added a piece of worbla trim to the base of the horns to disguise a place where the previous worbla didn’t line up very well.  At this point, let me mention the following PSA: DO NOT THROW YOUR WORBLA SCRAPS AWAY!!!!!  Being a thermoplastic, worbla does an amazing thing.  If you mess up, you can place all your scraps in an oven safe container and heat them into a congealed mass that you can roll out and use again!  Seriously! It works! I did this myself!


The first step to smoothing the horns was to add a coat of wood filler.  I used Minwax brand and I wore latex gloves.  Although the finished product was fine, this was incredibly hard to get out of the tube, so I finally had to cut open the back and scoop it out. Because of that, quite a bit went to waste.  This may have been a one-time fluke though.  I let this dry overnight again.


Minwax 6-oz Stainable Wood Filler http://www.lowes.com/pd_164701-24-42852000___?productId=3098375&pl=1&Ntt=minwax+wood+filler $7.97
The next day I sanded the horns with a medium grit sandpaper.  The next step was attaching the elastic strap.  I did this by cutting approximately 1/8” slices into the helm on either side of each horn and pushed a brad through the worbla, foam, and headband. 
Scunci No-Slip Grip Headbands Black http://www.walgreens.com/store/c/scunci-no-slip-grip-headbands/ID=prod2499474-product $5.99
I simply folded the backs of the brads over onto themselves to keep them out of sight.  I intended to glue the strap to the back of the helm, but it didn’t really seem necessary after it was assembled.


I then painted the horns with a coat of gesso, which is a very thick primer.  I allowed this to dry the equivalent of “overnight” while I was at work.  I tried to sand it with the medium grit sand paper again, but this part would have probably benefited more from a fine grit.  I was set to leave for Comic Con in about 18 hours, so I opted to move onto the painting step.  I already had some gold spray paint, and after my experience with overdoing the paint last year (some of my armor still wasn’t dry when it was time to leave), I took the “less is more” approach this time.  
Valspar 12-oz Gold Spray Paint http://www.lowes.com/pd_57766-4-465.0066009.076_0__?productId=3729675 $6.38

I allowed the helm to dry from a hanger off our attic ladder.  I used a foam head I bought from JoAnn Fabric for $4.99 to anchor the helm through part of the process, but I didn’t want to make a complete mess of it.
Liquitex 16-Ounce Basics Acrylic Gesso http://shop.hobbylobby.com/products/liquitex-16-ounce-basics-acrylic-gesso-137422/ $9.99
When the helm was dry, I glued the green glass stone onto the center base piece with the E-6000 glue.  I also used the hair dryer on the back to bend the shape to fit my head a little better.  The last step was using my leftover black foam and worbla to make a pad for the back of the helm to protect my head from the brads.  I did not actually attach this part to the helm, although I did glue the foam and worbla together just to be safe.  The worbla was probably not necessary, but I wanted to make sure the black foam wouldn't discolor my forehead. 

When you're ready to go back to your boring civilian alter ego, make sure you pack your helm very carefully.  I recommend a large rubbermaid container or hanging the helm from a hanger in your closet.  I would also advise against storing your helm in an attic or garage where heat could have an adverse effect on the worbla.  This should keep it in peak condition whenever you're ready to have the masses kneeling before you again.  In the end, they will always kneel ;)


Thursday, June 4, 2015

You Know You're In Loki's Army When... (Part 1)

Almost immediately after St. Louis Wizard World Comic Con last year, I started working on my costume for this year's event.  I chose to be Lady Loki (which was kind of an impulse decision considering there are a few other characters I've wanted to dress up as for years).  Lady Loki is not the easiest costume, but if you're willing to put in the effort, it will pay for itself in the attention you receive.


I decided to pay homage to the Avengers film franchise Loki in some of the details of my costume as well as honor the Lady Loki from print.  I opted to buy my dress and leggings as well as my jewelry, but I made my cape and helm.  I already owned the boots.  I will try to give specific details for each element below.


1. Dress


Sexy Plunging Neck Color Splicing Zipper Front Sleeveless Women's Bandage Dress http://www.trendsgal.com/p/wholesale-product-1154436.html $38.97

The only issue I had with the dress was that there was next to no room in the bust, and my regular alterations lady had to use black elastic from JoAnn Fabric to create gussets down the sides and add additional material to the front.  She moved the zipper up as well.  Fortunately, she thought the best design for the front would be overlapping diagonal strips (which acted as a nod to Tom Hiddleson's Loki).  This dress came from the Netherlands, so it really wasn't worth returning for the price.  (It's also a Herve Leger knockoff.)


2. Leggings


New! Egyptian Princess High Waist Women Fashion Leggings Pants Tights S M L http://www.ebay.com/itm/New-Egyptian-Princess-High-Waist-Women-Fashion-Leggings-Pants-Tights-S-M-L-/321094849187?ssPageName=ADME:L:OC:US:3160 $24.75
I had an exceptionally difficult time finding these in black and a size Large.  When all else failed, I gave Yahoo Images a shot and VIOLA!  Unlike the dress, these are very true to size and very comfortable.  I received many compliments on them, and the dye barely transferred.  (I doubt this would have happened at all had I washed them before I wore them the first time.)

3. Jewelry


Olivia Gold-Tone Collar Necklace http://shop.guess.com/en/Catalog/View/women/jewelry/olivia-gold-tone-collar-necklace/PM1020N-3 $29.00


Solid Brass Concave Cuff Bracelet Base 50.8mm (2 Inches) Wide - 1 Piece http://www.amazon.com/Solid-Concave-Bracelet-50-8mm-Inches/dp/B00ARLJMKQ/ref=sr_1_1?ie=UTF8&qid=1422502519&sr=8-1&keywords=50.8mm+2%22+cuff+bracelets&pebp=1422502531072&peasin=B00ARLJMKQ $8.25


Metallic Stud Earrings - Silver & Gold https://www.etsy.com/transaction/1030247574?campaign_label=transaction_buyer_notification&email_sent=1431711390&euid=r_kYmtSgjm-UreuNPb7c-FmJv_KA&eaid=14639380092&x_eaid=d48d8c52f7&show_panel=true $12.00
All of the jewelry was a deliberate nod to Tom Hiddleson's costume as well.  (The earrings are meant to mimic the studs on his bodice.)  I have sensitive ears, so I made sure to clean them with alcohol before I wore them.  I had no problems the entire day.

4.  Cape/Capelet/Cloak


Iridescent Taffeta Fabric Emerald Green By The Yard http://www.ebay.com/itm/IRIDESCENT-TAFFETA-FABRIC-EMERALD-GREEN-BY-THE-YARD-/360253248917?hash=item53e0c45595 $9.99

I purchased a scrap piece of 36x60" green/black iridescent taffeta from eBay for $7.99.  This is a similar product.  I then bought 36x58" of black taffeta from JoAnn Fabric for $5.99 to use as the backing.  I am 5'4", so I decided to make the cape 48" long.  I made the shoulder width 16" and the bottom width 36".  (I drew the diagonal lines with a white fabric pencil, a yard stick to mark the sides, and a round table cloth to mark the bottom.  You could also use a hula hoop, tree skirt, etc.)  After cutting out the material, I pinned the outsides together, sewed 3/4 of the edges, turned the cape right side out, and finished sewing the shoulder area.  (I knew this edge would be hidden by the fur trim.)  I didn't have time to attach the fur permanently, so they were attached with safety pins for the day, but I intend to replace them with snap closures.


Fashion Shrug Winter Luxury Faux Fur Collar Scarf Warm Warmer Shawl Wrap Stole E http://www.ebay.com/itm/Fashion-Shrug-Winter-Luxury-Faux-Fur-Collar-Scarf-Warm-Warmer-Shawl-Wrap-Stole-E-/131345930090?var=&hash=item0 $7.99


5. Helm/Helmet/Horns/Diadem


Credit: Thomas G Ricks / Fox 2 News
The instructions for this piece are substantial, so here is the link: http://cosplayforbeginners.blogspot.com/2015/06/you-know-youre-in-lokis-army-when-part-2.html 

6. Hair and Makeup


I used Roux Fanci-Full Rinse in Black Rage.  This was a nightmare.  I will most definitely suck it up and wear a wig next time.  I used OPI's "Jade is the New Black" nail polish.  The key elements to my makeup were CoverGirl EyeEnhancers in Champagne (710), Jordana EasyLiner in SeaGreen, and Revlon ColorStay LipLiner in Mauve.  I also used fake lashes, but I opted to cut on lash in half and only add volume to my outer lashes.


Credit: Thomas G Ricks / Fox 2 News

Credit: Nightfall Unlimited
I was in this costume for about 12 hours.  I only take it off while I was eating and during bathroom breaks.  The worst part was going outside to get some lunch because the helm made my forehead a little sweaty in the sun, and it started sliding around.  I did have a sore forehead for about 2 days after though (but it was only tender to the touch).  When it was all said and done, I'm glad I forced myself to learn these new skills.  I guess that's what it means to be burdened with a glorious purpose ;)

Thursday, June 26, 2014

Work With What You've Got

As a newcomer to cosplay, you can't expect perfection. Even professional cosplayers encounter problems from time to time. Sometimes even the best planned cosplays can still go wrong. People can gain or lose weight right before a big event, items can get lost or destroyed in the mail, pieces can tear and props can break, and sometimes designs can just fail to work out the way you plan.


Unfortunately, the pads of my Judge Anderson costume didn't dry in time, so I
had to make do with just my badges and green utility pouches (not pictured).
 

There is nothing wrong with reusing or repurposing old costumes. Sometimes, you will find inspiration well after the first time you wear a costume. Instead of thinking about what you could have done differently, think about what you still can do to make it the costume you were dreaming of.


This cosplayer decided to modify her steampunk Ariel costume.


If you plan to attend cosplaying events regularly but you don't have the time or funds to create a variety of diverse and complicated costumes, you can get away with reusing certain basic pieces. You can also piece together your ensemble using a generic store-bought costume or items from your closet. As long as you make it your own, it doesn't really matter where each of the elements come from.

With a few accessories and some theatrical accents, you could easily transform a number of costumes for very little money and still look great. Plus, cosplayers love to discuss the creative process and explore new ideas!  Here are just a few:
 

http://www.target.com/p/women-s-athenian-goddess-costume/-/A-13709403?ref=tgt_adv_XSG10001&AFID=google_pla_df&LNM=13709403&CPNG=Seasonal&kpid=13709403&LID=20pgs&ci_src=17588969&ci_sku=13709403&gclid=CjkKEQjwia-dBRC07eeatYGe-78BEiQArZhbgMo01QP-Zpr7BObvfDO207p8wlH6o3D0PKat5r_Prorw_wcBhttp://www.fanpix.net/1759463/016045381/gerard-butler-as-leonidas-and-lena-headey-as-queen-gorgo-in-300-2006-picture.html
A generic Cleopatra or Greek goddess costume can
easily be transformed into a Queen Gorgo (300) costume.
 
 
http://www.costumesluck.com/ProductDetail/Adult-Costumes/Double-Zip-Nurse-Plus-Adult-Costume/17981http://www.extmovie.com/xe/bestpost/1976770
 A basic cotton nurse costume can be dyed and
distressed to look like a nurse from Silent Hill.
 
 
http://www.props-n-frocks.co.uk/ladies-fancy-dress-costumes/AC461-miss-adams-halloween-costume.htmhttp://www.escapade.co.uk/sexy-fancy-dress-sale/sexy-halloween-costumes/young-moira-costume-68962.asp
The same dress could be used for both a Wednesday Addams and Moira O'Hara
(American Horror Story) costume with a little tweaking as well. 
 
 
http://www.popscreen.com/p/MTM1ODgxNDkz/Mens-Gangster-Mafia-Al-Capone-Fancy-Dress-Costume-+-Hat-eBayhttp://senzanessuntitolo.tumblr.com/image/12195543787
Even men can modify everyday costumes like turning a gangster
 costume into Jack Skellington (Nightmare Before Christmas).
 
 
If all else fails, you can turn just about any regular costume into a zombie.  The possibilities are endless!  What ideas can you think of?


Thursday, June 19, 2014

From One Beginner to Another

Planning your first cosplay can be both an exciting and a nerve-wracking experience. However, it can be much more rewarding if you follow a few basic suggestions.

First of all, choose a simple costume, and have it completed well in advance of the event you plan to wear it to. Don't plan an advanced costume for your first cosplay or wait until the last minute to complete it. Allow time for things to go wrong, and consider having a back-up costume on stand by in case your first choice doesn't turn out.

Always try your costume out ahead of time. Make sure each piece fits properly and that your shoes are comfortable. (Nothing is worse than suffering in an uncomfortable costume all day instead of enjoying your con.) Whether it is a body suit, temporary veneers, contacts, fake lashes, makeup, etc., you should test out every element of your costume so you don't make a mess the day of your event or suffer an allergic reaction to dyes, adhesives, etc.

Proper undergarments are also extremely important. Not only will they improve the overall shape of your costume, but they will also determine how easily you can take bathroom breaks throughout the day. Don't sacrifice hydration for an overly complicated costume. One way to avoid getting overheated is to choose a character with hair similar to yours and avoid wearing a wig. Try to leave outerwear at home as well since there is no guarantee that your event will have a coat check.

Also, decide what you are willing to carry and leave any unnecessary items at home. If your cosplay can incorporate pockets, pouches, or some kind of satchel, take full advantage of it. You will want to find a place for a wallet and your phone/camera (and make sure it is fully charged). You may also want to bring an emergency kit for simple fixes. On the other hand, if your cosplay calls for a prop, consider your options and choose the least heavy or cumbersome. Cons are crowded, and although props make for better photo ops, they can also get in the way and may get damaged accidentally.

Lastly, if you have questions, ask an experienced friend for help, or go to any number of websites for advice. Don't let yourself get discouraged if things don't turn out exactly how you plan the first time. After all, practice makes perfect!

Thursday, June 12, 2014

Cosplay 101

Welcome to cosplay!

"Cosplay" is short for costume play. This term originated in 1983, but the culture of cosplay has steadily increased since 1990. Cosplayers generally reserve their hobby for various fan conventions held throughout the year all over the country. The first US fan convention, or "con", was held in 1942. The largest American con, San Diego Comic Con International was first held in 1970.

Cons feature celebrity appearances, expert panels, various vendors, costume contests, photo ops, etc. They generally attract fans of comic books, video games, sci-fi and fantasy movies and TV shows, Japanese animation, and cult fandoms. A "fandom" is a culture of fans with common interests (i.e. Trekkies, Whovians, Twihards, etc.).

How cosplay differs from wearing a costume on Halloween is in the "play". Cosplayers emulate their characters' personalities. Cosplaying can range from signature expressions and poses to full blown monologues and skits. (This is not the same as LARPing, or Live Action Role Playing.)

Another important aspect of cosplay is craftsmanship. Cosplaying can be very expensive, but while some cosplayers can afford to buy elaborate costumes, others choose to piece their costumes together, make their own costumes from scratch, or even repurpose items they already own.

This cosplayer chose to purchase her Catwoman costume.

Chelsea Murphy made this steampunk Cinderella costume.

Rob Playter pieced together his 11th Doctor costume (from Dr. Who).


Most cosplayers choose mainstream characters that are easy to identify, however others prefer to pick more unique costumes to stand out from the masses. If done well, many people can still identify even the most obscure character.

A growing trend among cosplayers is the creation of mashup costumes. This is done by combining 2 genres of fandom such as steampunk, super heroes, Disney characters, etc. Others combine 2 or more versions of the same character from literature and/or film versions. Some cosplayers even design their own characters.

The best characters to cosplay are those you feel a personal connection to, whether you already relate to them or you aspire to be more like them. Whatever franchise you consider yourself a fan of, there are countless opportunities to display your fandom proudly.